“It’s Alive! It’s Alive”, Victor Frankenstein
These “strat” assembly kits can be purchased from ebay.com. They are available from $91 to $150. I purchased this kit for $99. (https://www.ebay.com/sch/i.html?_from=R40&_trksid=p2380057.m570.l1311.R1.TR5.TRC0.A0.H0.Xdiy+strat+.TRS0&_nkw=diy+strat+kit&_sacat=0)

There are some very good YouTube videos describing the quality of this kit in detail. It has many quality deficits:
- The pickups have a low output.
- The bridge/saddle is made of pot metal.
- The tuning keys are low quality and have too much play.
- The body routing and shaping is sloppy but functional.
- The body is also made of extremely light wood. One of the YouTube videos compared the wood to balsa wood, not too far off.
- The frets need to be filed on the edges and need to be hammered down to fix the gaps.
- Frets also need to be filed to be uniform in height.
- Truss rod adjustment needed, no big deal.
This is a good review of the kit: https://www.youtube.com/watch?v=pZe1nuZqspY
Why then buy this kit?
This is a great learning tool and a fun project. I am primarily a player and would rely on others to install pickups and fret adjustments. The challenge is on! Can a reasonably good playing and sounding instrument be made from this mass produced kit of suspect quality? Stay Tuned!
Steps:
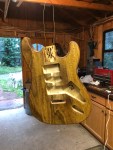
- Sand body and neck
- I purposely did this on the cheap. I used Old English for color with boiled linseed oil. Once this was somewhat dry I sprayed a light coat of polyurethane. There are much better options to be sure but I like the result.
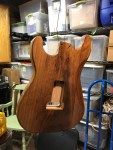
- After the body and neck had dried to touch I joined the neck to the body with the screws and plate provided.
- Once this step was completed I could pretty much assemble the parts that came with the guitar to test the quality of the kit as provided.
- Once the neck was attached to the body, bridge/saddle and tuning keys were added and I was able attach the strings I was able to check the neck for a bow. It had a convex bow causing fret buzz at the fifth fret.
- Using a straight edge level I was able to see the bow.
- Loosening the truss rod fixed this problem.
- Next the fret height needed to be leveled. Using the same straight edge level, I added double sided tape and stuck 250 grit sand paper to the bottom of the straight edge.
- Using a black permanent marker I colored the top of the frets. The level and sand paper was moved GENTLY across the frets until the permanent ink disappeared.
- After this step it was time to restring the guitar and do the set up.
Phase 1.
Phase 2.
